


Summer Blues: Crocheted bag made from Hip Hexies
And old make has come to a new use – the Hip Hexie – a bunch of those and Voilá, a spacious, gorgeous summer bag with room for a towel, a book, sun screen and of course your crochet! Perfect for the beach, just toss it over your shoulder. Add a lining and a zipped pocket and your phone and car keys won’t get lost under all your stuff. Happy Hooking!
THE YARN
For the bag shown in the photos, I have used both Drops Paris and Drops Loves You 5. Drops Loves You 8 is just as applicable and comes in gorgeous shades too. That means that you can happily mix and match all shades from all the yarns mentioned, like I did. As Loves You is about to be discontinued, the pattern colors are listed in Paris, though you might be lucky still to find some of the recycled cotton in some shops.
YOU WILL NEED
Drops Paris,
2 skeins of each color Light Turquoise (02), Dark Turquoise (10), Light Mint Green (21), Medium Purple (31) og
3 skeins Off White (17)
A hook size 5.0 mm
A big embroidery needle for fastening ends
BEFORE YOU BEGIN
All rounds begin with one or more chains, counting as the first stitch. All rounds are closed with a slip stitch to the chain. Crochet all 20 hexies and make sure to fasten all ends before joining them on the fly with a superflat sc join. Alternatively you can edge each hexie and sew them together instead. More about that when it’s time for assembly.
ABBREVIATIONS (US)
Ch / chain
Sl st / slip stitch
Sc / single crochet
Hdc / half double crochet
Dc / double crochet
Tog / together
Rep / repeat
Sp / space
X / times
HOW ITS MADE
Hip Hexie
In a magic ring ch4 (counts as 1 dc, ch2), *3 dc, ch2*. Repeat * 4x. 2 dc, sl st in 2. ch (18 dc, 6 ch2)
Next, put [ch2, 2 dc, ch1, 3 dc] in the ch between two groups of dc, *3 dc, ch1, 3 dc* in næste ch sp, rep * 4x, sl st in ch. (36 dc, 6 ch sp)
Chain 2, 2 dc. In a corner ch sp put *[1 dc, ch1, 1 dc]. 6 dc*. Repeat 4x. [1 dc, ch1, 1 dc] in the corner ch sp, 3 dc, close off with a sl st to ch (42 dc, 6 ch sp)
Break yarn and fasten all ends securely..
 Make the following number of hexies: 4 dark turquoise, 4 light mint green, 6 light turquoise, 6 medium purple.
 ASSEMBLY
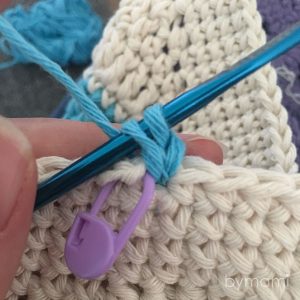
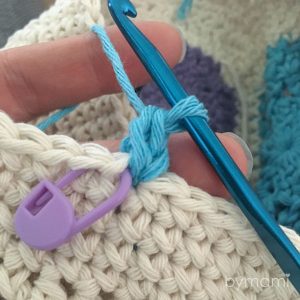
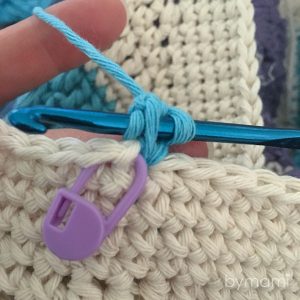
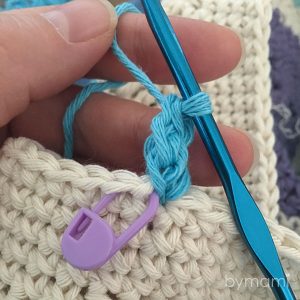
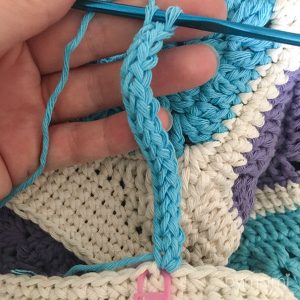
The hexies are joined using the superflat sc join. Find a video on how to right here. Feel free to subscribe! The hexies are crocheted together into one piece of fabric by following the direction shown in the chart below. There are numerous ways to join this, important, however, is that none of the outer edges get stitched – these edges are needed when closing up the bag. Below you will find the written instructions as for how to assemble the hexagons (L). I have tried my very best to write it as descriptive and easily understandable as possible. If in doubt, take a look at the chart. A good advice for anyone who has not yet joined in this manner, is to number your hexies with a piece of paper and a safety pin, that makes it a lot less brainy.

Samling af lapper / Joining hexies
Joining the hexagons
Using Off White to join. If you don’t want to join-as-you-go, edge all hexies with a round of sc along the sides and [1 sc, 1 hdc, ch1, 1 hdc, 1 sc] in the corners, except for 3 of each of light turquoise and medium purple. These hexies all need to have one corner with just one single crochet stitch. These corners are turned to the top edge of the bag. Hereafter the hexagons can be sewn or crocheted together as described in the next section. Else, follow these directions to a continuous join:
- Begin with [1 hdc, 1 sc] in the first corner (half beginning corner, hereafter bc). 8 sc along the side, [1 sc, 1 hdc, ch1, 1 hdc, 1 sc] (complete corner, hereafter cc). 8 sc, cc, 8 sc, [1 sc, 1 hdc, ch1] (half ending corner, hereafter ec). Please note! The two half corners differ from one another!
- Bc (join this side with L1), 8 sc, cc, 8 sc, cc, 8 sc, ec
- Bc (join this side with L2), 8 sc, cc, 8 sc, cc, 8 sc, cc, 8 sc, ec
- Bc (join with L3), 8 sc, cc, 8 sc, cc, 8 sc, ec
- Bc (join with L4), 8 sc, cc, 8 sc, cc, 8 sc, ec
- Bc (join with L5), 8 sc, cc, 8 sc, cc, 8 sc, cc, 8 sc, ec
- Bc (join with L6), 8 sc, cc, 8 sc, cc, 8 sc, cc, 8 sc, ec
- Bc (join with L7), 8 sc, cc, 8 sc, cc, 8 sc, cc, 8 sc, ec
- Bc (join with L8), 8 sc, cc, 8 sc, cc, 8 sc, cc, 8 sc, ec
- Bc (join with L9), 8 sc, cc, 8 sc, ec
- Bc (join with L10), 8 sc, [1 sc, 1 hdc, sl st in corner between L9+L10, 1 hdc, 1 sc] (Please Note! This is a special corner (hereafter spc), joining 3 hexagons), (join this side with L9), 8 sc, cc, 8 sc, ec
- Bc, (join with L11), 8 sc, spc L9+11, (next side is joined with L9) 8 sc, spc L8+9, (next side is joined with L8) 8 sc, cc, 8 sc, ec
- Bc, (join with L12) 8 sc, spc L8+12, (next side is joined with L8) 8 sc, spc L7+8, (next side is joined with L7) 8 sc, cc, 8 sc, ec
- Bc, (join with L13), 8 sc, spc L7+13, (next side is joined with L7) 8 sc, spc L6+7, (next side is joined with L6) 8 sc, cc, 8 sc, cc, 8 sc, ec
- Bc, (join with L14) 8 sc, cc, 8 sc, ec
- Bc, (join with L15) 8 sc, spc L14+15, (next side is joined with L14) 8 sc, spc L6+14, (next side is joined with L6) 8 sc, spc L5+6, (next side is joined with L5) 8 sc, spc L5+4, (next side is joined with L4) 8 sc, spc L3+4, (next side is joined with L3) 8 sc, in the corner put [1 sc, 1 hdc], slip stitch in corner between L15+16,
continue in the corner of L15 with [1 hdc, 1 sc]. (next side is joined with L3) 8 sc, spc L2+3, (next side is joined with L2) 8 sc, spc L1+2, (next side is joined with L1) 8 sc, cc, 8 sc, in corner put [1 sc, 1 hdc], slip stitch in corner between L14+15, continue in corner of L14 with [1 hdc, 1 sc]. 8 sc, in corner put [1 sc, 1 hdc], slip stitch in corner between L13+14, continue in corner of L13 with [1 hdc, 1 sc]. 8 sc, cc, 8 sc, in corner put [1 sc, 1 hdc], slip stitch in corner between L12+13, continue in the corner of L12 with [1 hdc, 1 sc]. 8 sc, cc, 8 sc, in corner put [1 sc, 1 hdc, slip stitch in corner between L11+12, continue in the corner of L11 with [1 hdc, 1 sc]. 8 sc, cc, 8 sc, ec - Bc (join with L11), 8 sc, cc, 8 sc, ec
- Bc, (join with L17), 8 sc, spc L11+17, (next side is joined with L11) 8 sc, spc L11+12, (next side is joined with L12) 8 sc, cc, 8 sc, ec
- Bc, (join with L18), 8 sc, spc L12+18, (next side is joined with L12) 8 sc, spc L12+13, (next side is joined with L13) 8 sc, cc, 8 sc, ec
- Bc, (join with L19), 8 fm, spc L13+19, (next side is joined with L13) 8 sc, spc L13+14, (next side is joined with L14) 8 sc, spc L14+15, (next side is joined with L15) 8 sc, spc L1+15, (this last side is joined with L1) 8 sc, finish with 1 sc and 1 hdc in the corner, sl st in hdc of L1. Brreak yarn and fasten ends.

Samling af tasken / Closing the bag
Closing the bag
Still using Off White, begin in the corner of L1 (see chart above) and do [1 hdc, 1 sc]. 8 sc along the side, [1 sc, 1 hdc] in the corner. Slip stitch in corner between L1+2, continue in the corner of L2 with [1 hdc, 1 sc]. 8 sc, cc, 8 sc, cc, 8 sc. [1 sc, 1 hdc] in the corner. Slip stitch in corner between L2+3, continue in the corner of L3 with [1 hdc, 1 sc]. 8 sc, cc, 8 sc, [1 sc, 1 hdc] in the corner, slip stitch in corner between L3+4.

Samling af hjørner / Joining bottom corners
Now, the first half side of L4 is joined with L3, continue the other half side on L4 only, with 4 sc, cc, 8 sc, cc, 8 sc. [1 sc, 1 hdc] in the corner. Slip stitch in corner between L4+5, continue in the corner of L5 with [1 hdc, 1 sc]. 8 sc, cc, 8 sc, cc, 8 sc. [1 sc, 1 hdc] in the corner. Slip stitch in corner between L5+6.
Join the first half side of L6 with L5, continue on L6 only with 4 sc. [1 sc, 1 hdc] in the corner. Slip stitch in corner between L6+7.
Join the first half side of L7 with L6, while the other half is joined with the leftover half of L5. Cc, continue to join L7 and L5 using 8 sc. [1 sc, 1 hdc] in the corner.
Slip stitch in corner between L7+8, continue in the corner of L8 with [1 hdc, 1 sc] (join with L5), 8 sc, spc L4+5, 8 sc. [1 sc, 1 hdc] in the corner.
Slip stitch in corner between L8+9, continue in the corner of L9 with [1 hdc, 1 sc] (join with L4), 8 sc.
Join the first half of L9 with L4, while the other half is joined with the leftover half of L3. Cc, continue joining L9 and L3 with 8 sc. Spc L2+3, (next side is joined with L2) 8 sc, [1 sc, 1 hdc] in the corner. Slip stitch in corner between L9+10, continue in the corner of L10 with [1 hdc, 1 sc] (join with L2), 8 sc. [1 sc, 1 hdc] in the corner.
Slip stitch in corner between L10+11, continue in the corner of L11 with [1 hdc, 1 sc] (join with L2), 8 sc. Spc L1+2, (next side is joined with L1) 8 sc, [1 sc, 1 hdc] in the last corner. Break yarn and fasten all ends.
 Top edge
Using Off White: Fasten the yarn in any 2nd stitch to the left of a top corner along the edge of the bag. Chain 1 (counts as 1st stitch), 6 sc, [1 sc, 1 hdc] in the corner, Slip stitch in corner between 2 hexagons, *[1 hdc, 1 sc] in the top corner, 17 sc (8 sc, 1 sc in top corner, 8 sc), [1 sc, 1 hdc] in the corner, sl st between hexies*. Repeat * 5x total. 10 sc, sl st in ch (132)
Ch1 (counts as sc), *2 hdc, 4 dc, dc5tog (like this: 1 in each stitch in first corner, 1 in sl st, 1in each st of second corner), 4 dc, 2 hdc, 5 sc*, rep 5x total. 2 hdc, 4 dc, dc5tog (1 in each stitch in first corner, 1 in sl st, 1in each st of second corner), 4 dc, 2 hdc, 4 sc, sl st in ch (108)
Ch1, *2 sc, 2 hdc, 1 dc, dc3tog, 1 dc, 2 hdc, 9 sc*, rep 5x total. 2 hdc, 1 dc, dc3tog, 1 dc, 2 hdc, 6 sc, sl st in ch (96)
Ch1, 95 sc, sl st in ch (96) 5x total (if you want a slimmer edge, repetitions can be shaved down to 2x).


 Strap
Strap
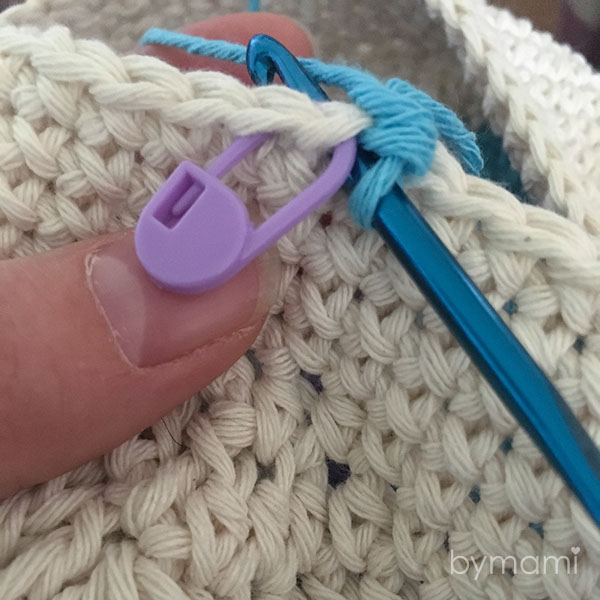
Put a marker in 2 stitches directly above on of the side seems of the bag and count 46 stitches. Put another marker in each of the next 2 stitches. Make sure to count the stitches from beween these and the first markers, there should be 46. The first two rows of the strap are crocheted of one chainless sc foundation row and a row of regular single crochet. Find a video and a visual tutorial on how to crochet the chainless sc foundation row right here. First row is made as follows:
-
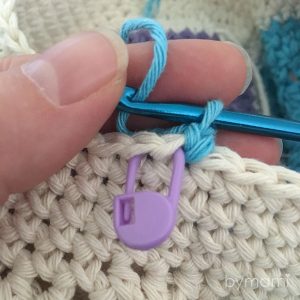
- Attach yarn to the first of two marked stitches
-

- Pull up a loop through the same stitch
-
- You have 2 loops on your hook
-

- YO and ch1 through first loop on hook
-
- YO and finish the single crochet
-
- Pull up a loop through the chain from before
-
- Repeat the last three steps
-
- Repeat until you have made 85 stitches
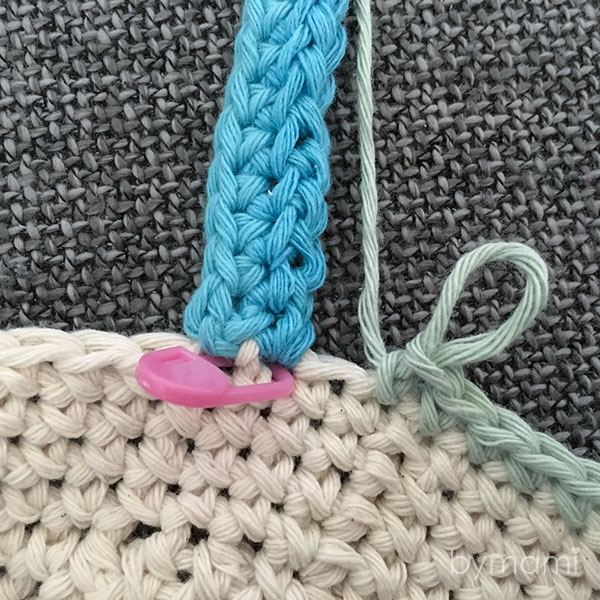
Using light turquoise, attach yarn to the first of two markers, pull a loop through the same stitch ( 2 loops on hook), yarn over and pull through first of two loops on hook (this ‘extra’ chain is foundation for the next stitch!). Yarn over and finish the single crochet by pulling through both remaining loops on hook.. *Pull up a loop through the extra stitch from before, YO and pull through first loop on hook. YO and finish sc by pulling through remaining two loops on hook*. Repeat * 83x or until the strap has the desired length. Attach to the opposite side of bag with a sl st in the 2nd of two marked stitches. Sc in the first marked stitch, 85 sc (or the amount of stitches made) back, slip stitch in the 2nd of marked stitches. Break yarn and fasten ends.

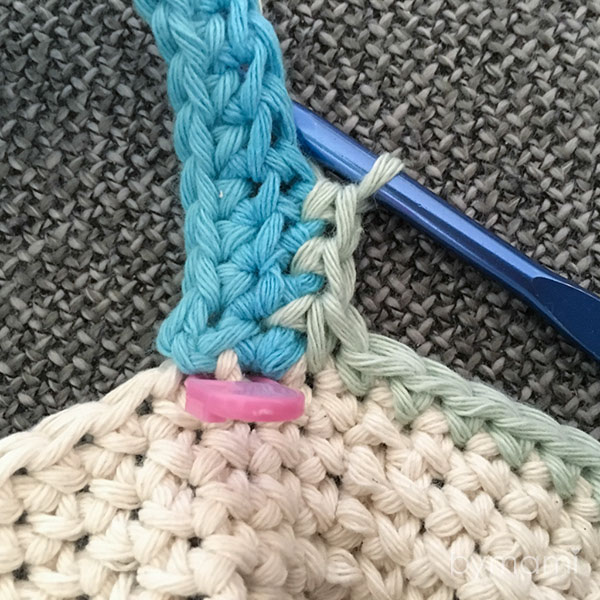
Using Light Mint Green, attach yarn in any stitch of the edge of bag. I recommend moving the starting point of each new color to make them less visible. Ch 1, 1 sc in each st along the edge until last st before strap.. Sc2tog (the last stitch before and the first st of strap). 83 sc along the strap, sc2tog (the last st of strap and first st of the edge of bag). 1 sc in each st, sl st in ch. Break yarn and repeat on the opposite side of the bag.
Using Medium Purple, attach yarn in any stitch of the edge of bag. Ch 1, 1 sc in each st along the edge until last st before strap.. Sc3tog (1 in each of the last stitch of the edge, the corner between the two and the first st of strap). 81 sc along the strap, sc3tog (the last st of strap, corner and first st of the edge of bag). 1 sc in each st, sl st in ch. For a neat edge, finish with a round of slip stitches. Break yarn and repeat the two rounds on the opposite side of the bag.
The strap of Summer Blues Bag is 6 rows wide without the finishing round of slip stitches. If you want a wider strap, keep adding rounds as above. Please note that the bag will become longer with each added round, so I recommend reducing the number of white rounds accordingly.


Let me see your Bymami makes
I absolutely LOVE to see the things created from my patterns, it makes me very, very happy knowing that the patterns I spend a lot of time writing are being used!
Post photos of your Bymami makes in a comment below, share it on Bymamis facebook or in your Instagram feed and tag it #summerbluesbag. Make sure you tag @bymamidk on the photo or in your caption if you want me to see it!
All your lovely crochet makes me so darn happy! <3
Sponsored
The danish version of this post contains affiliate links. By clicking them you are supporting bymami.dk to keep the free patterns coming. Thank you for your help!

